7. Document Annotation
Document Annotation
This scenario demonstrates how to annotate documents in Circularo by adding visual elements such as QR codes, text, or images. Document annotation allows you to enhance documents with visual markers that can provide additional information.
Key features:
Add QR codes that link to document preview, detail, or verification pages
Position annotations precisely on specific pages
Enhance documents with visual elements without modifying the original content
Support for various annotation types including barcodes, images, and text
QR Code Functionality
When you add a QR code to a document, it can be scanned with a mobile device to access one of three options:
Document preview: View the document directly
Document detail: Access the document's metadata and details page
Verification page: Verify the document's authenticity
These options can be configured in your organization's settings to match your specific requirements.
While this scenario focuses on QR codes, the annotation endpoint can be used for various types of annotations including text, images, and other visual elements.
Step 1 - Upload a PDF file
Before creating a document, you need to upload the PDF file that will serve as the document content. This step uploads and stores a PDF file in the Circularo system.
The file is uploaded as a multipart/form-data request
The response includes the file ID that will be used in the document creation step
The response also includes storage quota information to help manage available space
The file upload is a separate step from document creation, as shown in previous scenarios.
Endpoint
POST /files/saveFileRequest
POST /files/saveFile?token=6jeFMJnTDkYeSrlPcuUqzHWKuLy18VqVHhwNDrqcsU4z2GeQ36KKaiRzRsSppAdG

Content-Type: multipart/form-data

{
  "file": "blob",
  "fileName": "My PDF file"
}
Response
The response contains the following important properties:
fileHash - Located at
file.idin the response.Example value:
4VfVXhldfO0jztjKnDKAb0ckR7mIcNGBvK9Nl9TrjO8Qra0ZdMXlNlG7QjaL6zoe
The PDF file has been successfully uploaded and stored in the system. The response includes the file ID that will be used in the next step to create a document based on this file.
The file.id is the unique identifier for the uploaded file
This ID will be used in the document creation step to reference this file
The storage information shows your current usage and available quota
Store the file ID for use in the next step. This ID is required to create a document based on this file.
Step 2 - Create a document from PDF file
This endpoint creates a new document in the Circularo system using the previously uploaded PDF file.
The documentType parameter specifies which metadata definition to use
The workflow parameter defines the workflow that will be applied to the document
The definitionType parameter is set to "ext" to indicate an external file-based document
The pdfFile.content parameter references the file ID from the previous step
This step is similar to the document creation shown in previous scenarios.
Endpoint
POST /documentsRequest
POST /documents?token=6jeFMJnTDkYeSrlPcuUqzHWKuLy18VqVHhwNDrqcsU4z2GeQ36KKaiRzRsSppAdG

Content-Type: application/json

{
  "body": {
    "documentType": "d_default",
    "documentTitle": "My Document",
    "pdfFile": {
      "content": "4VfVXhldfO0jztjKnDKAb0ckR7mIcNGBvK9Nl9TrjO8Qra0ZdMXlNlG7QjaL6zoe"
    }
  },
  "definitionType": "ext",
  "workflow": "wf_archive"
}
Response
The response contains the following important properties:
barcode - Located at
results[0].barcodein the response.Example value:
edS3HUnvAPvE1gx7aLWIHCWzaTpLY8xomvu0YO8BE0n8agzdL77Lx0BmbVU4NpBZ
documentId - Located at
results[0].documentIdin the response.Example value:
68d7aa0d-651a-435a-802f-e8afd335ad14
The document has been successfully created and is now available in the system.
The response includes the document ID which can be used for subsequent operations
The barcode field contains a unique hash that will be used for QR code generation
This barcode hash is essential for the annotation step that follows
Store both the document ID and barcode hash for use in subsequent steps. The barcode hash is specifically needed for QR code annotation.
Step 3 - Retrieve document version
Before annotating a document, you need to retrieve its current version. Document versioning ensures that annotations are applied to the correct version of the document, preventing conflicts when multiple users are working with the same document.
The document ID is used to retrieve the document details
The response includes the current document version needed for annotation
The response also confirms the barcode hash if you didn't store it from the previous step
Document version is critical for operations that modify documents. Using an outdated version will result in a version mismatch error.
Endpoint
GET /documents/:documentIdRequest
GET /documents/68d7aa0d-651a-435a-802f-e8afd335ad14?token=6jeFMJnTDkYeSrlPcuUqzHWKuLy18VqVHhwNDrqcsU4z2GeQ36KKaiRzRsSppAdGResponse
The response contains the following important properties:
barcode - Located at
results[0].barcodein the response.If you did not save the barcode hash before you can retrieve it now.
Example value:
edS3HUnvAPvE1gx7aLWIHCWzaTpLY8xomvu0YO8BE0n8agzdL77Lx0BmbVU4NpBZ
documentVersion - Located at
results[0]._versionin the response.Example value:
3
The response includes the current document version and confirms the barcode hash.
The _version field contains the current document version required for annotation
The barcode field contains the barcode hash that will be used for QR code generation
Other document metadata is also included in the response
If any subsequent request fails with status code '409 - Version mismatch', you'll need to call this endpoint again to get the updated document version. Background tasks may change the document version after creation.
Step 4 - Add QR code annotation to document
This endpoint adds a QR code annotation to the document. The annotation API is versatile and can be used to add various types of annotations including QR codes, text, images, and other visual elements.
The id parameter specifies which document to annotate
The documentVersion path parameter ensures you're modifying the correct version
The images array contains the annotation details
The position object defines where the annotation will appear on the page
The pages array specifies which pages to annotate
The blob parameter contains the barcode hash
The subtype parameter defines the type of annotation
While this example shows QR code annotation, you can use the same endpoint for text annotations, image overlays, and other visual elements by changing the subtype and providing appropriate content.
Endpoint
PUT /documents/annotate/:documentVersionRequest
PUT /documents/annotate/3?token=6jeFMJnTDkYeSrlPcuUqzHWKuLy18VqVHhwNDrqcsU4z2GeQ36KKaiRzRsSppAdG

Content-Type: application/json

{
  "id": "68d7aa0d-651a-435a-802f-e8afd335ad14",  //Document ID
  "images": [
    {
      "comment": "",
      "position": {  //Position of the barcode
        "percentX": 0.8,
        "percentY": 0.5,
        "percentWidth": 0.1,
        "percentHeight": 0.07071043771043767
      },
      "pages": [  //Which page to add it to
        1
      ],
      "blob": "edS3HUnvAPvE1gx7aLWIHCWzaTpLY8xomvu0YO8BE0n8agzdL77Lx0BmbVU4NpBZ",  //Barcode hash
      "subtype": "image_barcode"
    }
  ]
}
The document has been successfully annotated with the QR code:
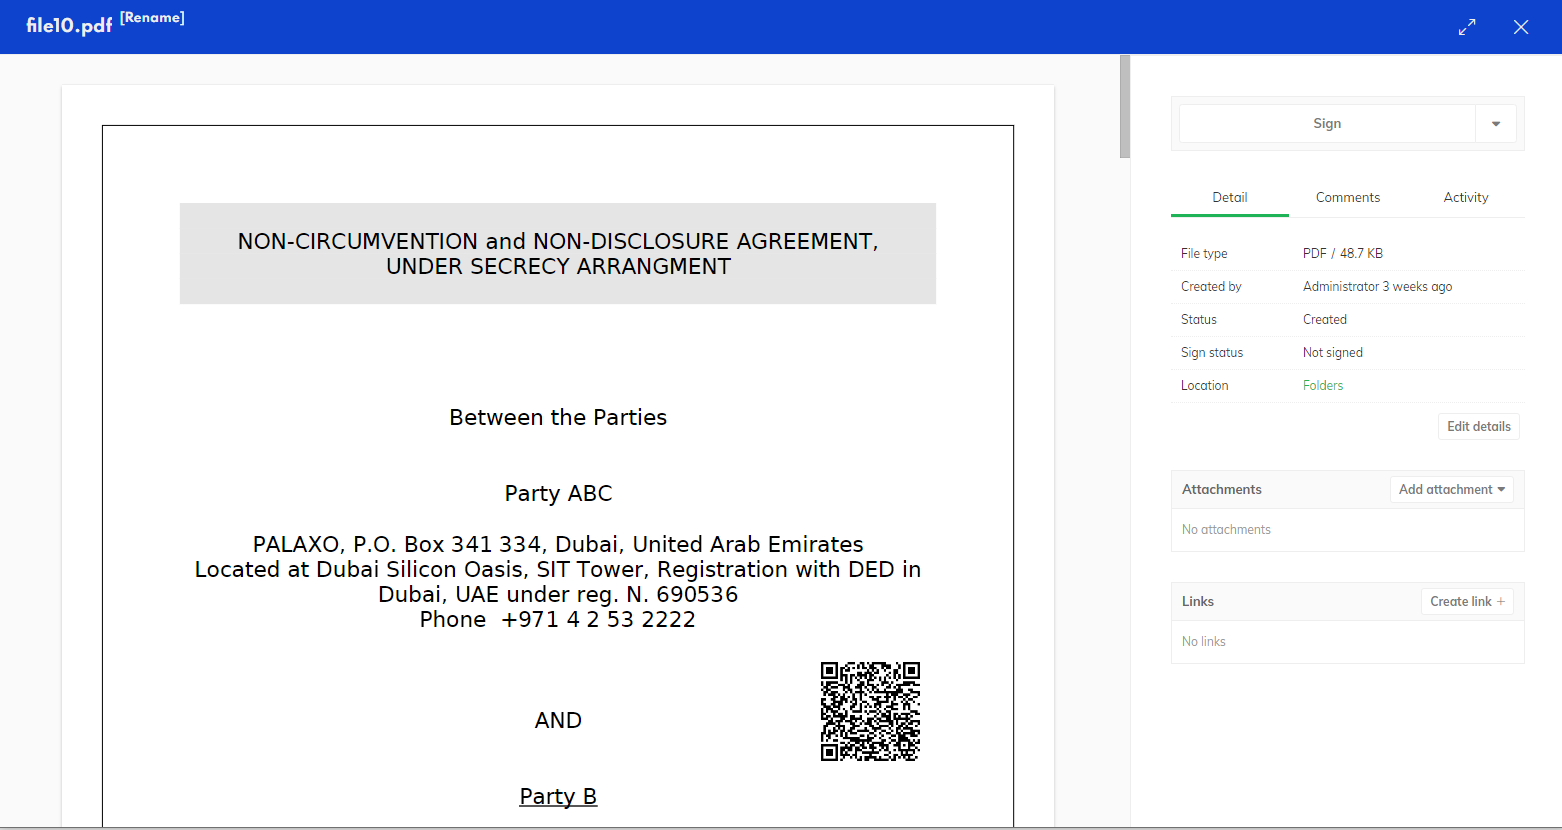
The QR code is now embedded in the document at the specified position
When the document is viewed or printed, the QR code will be visible
When scanned, the QR code will direct users to the configured destination (preview, detail, or verification page)
You can add multiple annotations in a single request by adding more objects to the images array.
Document Annotation Summary
You have successfully learned how to annotate documents in Circularo by adding QR codes. This functionality enhances documents with interactive elements that can be scanned to access document previews, details, or verification pages.
Key Concepts
Document Annotation: The process of adding visual elements to documents without modifying the original content
QR Codes: Machine-readable codes that can be scanned to access document-related functionality
Positioning: Precise placement of annotations using percentage-based coordinates
Document Versioning: Ensuring annotations are applied to the correct version of the document
Annotation Types
While this scenario focused on QR codes, the annotation endpoint supports various types of annotations:
QR Codes: For linking to document functionality
Text Annotations: For adding comments or notes
Image Overlays: For adding logos, signatures, or other images
Example Implementation
See our OpenAPI documentation to learn about the full set of API endpoints and parameters.
Please use proper exception handling and function decomposition in your own code. The code is provided for illustrative purposes only and is not intended for production use.
// Document annotation example
const URL = "https://sandbox.circularo.com";
const API_PATH = "/api/v1";
const TOKEN = "YOUR_AUTH_TOKEN"; // Obtained from login or API key

try {
    // Step 1: Upload a PDF file
    const formData = new FormData();
    formData.append('fileName', 'Document for Annotation');
    formData.append('file', fs.createReadStream('path/to/document.pdf')); // Using Node.js fs module

    const uploadResponse = await fetch(`${URL}${API_PATH}/files/saveFile?token=${TOKEN}`, {
        method: 'POST',
        body: formData
    });
    if (!uploadResponse.ok) {
        throw new Error(`File upload failed: ${uploadResponse.status} ${uploadResponse.statusText}`);
    }

    const uploadData = await uploadResponse.json();
    const fileId = uploadData.file.id;

    // Step 2: Create a document using the uploaded file
    const createResponse = await fetch(`${URL}${API_PATH}/documents?token=${TOKEN}`, {
        method: 'POST',
        headers: {
            'Content-Type': 'application/json'
        },
        body: JSON.stringify({
            body: {
                documentType: "d_default",
                documentTitle: "Document with QR Code",
                pdfFile: {
                    content: fileId
                }
            },
            definitionType: "ext",
            workflow: "wf_archive"
        })
    });
    if (!createResponse.ok) {
        throw new Error(`Document creation failed: ${createResponse.status} ${createResponse.statusText}`);
    }

    const createData = await createResponse.json();
    const documentId = createData.results[0].documentId;
    const barcodeHash = createData.results[0].barcode;

    // Step 3: Get the document version
    const documentResponse = await fetch(`${URL}${API_PATH}/documents/${documentId}?token=${TOKEN}`);
    if (!documentResponse.ok) {
        throw new Error(`Failed to retrieve document: ${documentResponse.status} ${documentResponse.statusText}`);
    }

    const documentData = await documentResponse.json();
    const documentVersion = documentData.results[0]._version;

    // Step 4: Add QR code annotation to the document
    const annotateResponse = await fetch(`${URL}${API_PATH}/documents/annotate/${documentVersion}?token=${TOKEN}`, {
        method: 'PUT',
        headers: {
            'Content-Type': 'application/json'
        },
        body: JSON.stringify({
            id: documentId,
            images: [{
                comment: "",
                position: {
                    percentX: 0.8,
                    percentY: 0.5,
                    percentWidth: 0.1,
                    percentHeight: 0.07071043771043767
                },
                pages: [1],
                blob: barcodeHash,
                subtype: "image_barcode"
            }]
        })
    });
    if (!annotateResponse.ok) {
        throw new Error(`Document annotation failed: ${annotateResponse.status} ${annotateResponse.statusText}`);
    }

    console.log('Document successfully annotated with QR code');

} catch (error) {
    console.error('Error in document annotation process:', error.message);
}
When adding annotations, be mindful of their placement to ensure they don't obscure important document content. Test the positioning to ensure proper display.